 I had so much fun creating this little cutie, it was a real joy to design this cake for one of my favorite families (between mom and daughter #1 they've become welcomed regulars). The cake for Audrey's first birthday was based on a handful of photos that were sent to me and a copy of the invite - with a cupcake on it of course. We needed to pump up the colors just a tiny bit, and make the cupcake the focal point. I love that Audrey's mom let me sort of do my own thing with the cake within the idea range she sent me. They loved it!
Birthday girl was napping at delivery time so I'll have to wait to see her reaction in photos; I especially hope to see her with her very own little coordinating "smash cake" sitting to the side of the cake. I make those for every first birthday cake I do as my little gift - hey...gotta get 'em hooked young! ;-)
The bottom cake is a 4 layer 10" round Caramel Apple cake (one of my signature flavors) and the cupcake was made using a couple 6" layers, a 7", and half of a ball pan. No giant cupcake pan here, just a little carving and voila! Add some delicious butter cream, made from scratch fondant and a chocolate #1 and there you have it - a first birthday cupcake fit for a princess!
After delivering the cake, I took my own little cupcakes out for a great day of some very last minute back to school shopping. It was a terrific day all around!
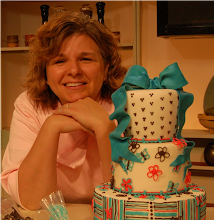
August 31, 2008
Every girl's first cupcake should be this grand...

August 29, 2008
OMG is that a Carrot Cake?
 Why, yes, yes it is a carrot cake! After leaving for a mini vacation after delivery I thought it was time I dig up the photos I took of Chris and Amy's cake...you know, the one with all those fabulous carrots in it! Their farm is amazing, fresh green everywhere - my husband is eager to get more info about their harvest sharing programs; you can get the info here.
So, out of the 14 or so pounds of carrots that Amy brought to me for her cake, we ended up with just under 13 after trimming the ends and used just over 10 of it for the cake. This cake consisted of 10 batches of cake, made with as many organic ingredients as possible - almost all of them! I am in love with cream cheese icing I made with organic cream cheese and fresh butter from Hillcrest Dairy in Moravia NY, made with cream from cows not treated with rBST; so salty and creamy. I was excited to see that Wegman's (the Dewitt location) carried it in their ever expanding organic and special diet section. With a little fresh lemon juice and organic sugar, and some vanilla bean...it was delicious!
I assembled the baked layers, I think 7 or 8 in all (I don't recall!) with the dreamy cream cheese icing in between each, then carved to my little heart's content. Somewhere, out there, was a very happy Bugs Bunny I'm sure. ;-) Then I finished it off with the fondant we make here in the studio - this was the one element that we did not attempt to create with organic ingredients. (is there organic gelatin or glycerin out there??) A little pleating, some creative folding, and hand painting resulted in a very satisfying carrot. At 39" long before the stem was added, and over 50lbs, this big guy made quite an impression on the few folks in the tent when we delivered. The "dirt" was crumbs of organic cookies and graham style crackers (Paul Newman's Own brand). The leafy green was celery stalk if you can believe that?! We needed something fresh and green and big enough and low and behold my husband ran down to Dawn Hotaling's fresh produce stand (Plantation Farms I believe is the name) on State Hwy 26 and Route 42 just at the edge of South Otselic and picked up the perfect size bunch! One last look for you...I hope you enjoyed the suspense of these cake photos. I'm glad you hung in there with me until I could blog them. Our busy summer is finally starting to come to an end and with school just around the corner we were blessed to squeeze in an unexpected trip to St. Clair Shores MI to see some family that lives there and more that were visiting from AZ. Couldn't pass that up! We've had our fill of the great New York State Fair as well, and are now anxiously awaiting the first day of school next week! With that first day with a new teacher right around the corner as well, we'll be moving on from carrots to apples soon I'm sure. Mom always said to eat your fruits and veggies...
Thanks again Amy and Chris for finding me and asking me to do your cake, definitely a favorite for the year! See you soon!
August 19, 2008
Beautiful Carrots!

I'm seriously craving carrots here! Amy and Chris from Common Thread just dropped off about 14 lbs of fresh organic carrots for their wedding cake this weekend.
I am so excited about this cake. They've grown and harvested the carrots themselves on their farm and have asked for as many locally produced organic ingredients to be used as possible in their cake.
But the most exciting aspect of this order is not that they are getting a carrot cake, not just a carrot cake, but a carrot shaped carrot cake! Yes, their wedding cake. Weird? Not at all! Not weird to them, and not weird for us! I'm super happy that they found me and asked me to do their cake. Stay tuned...the wedding is this weekend, so there will be photos by next week.
Now...just to hide the carrots in the studio so my self proclaimed vegifruititarian 10 yr old daughter doesn't eat them all! (and I'll have to fight the urge too, they just look so fantastic and crisp!)
Head on over to Common Thread's site to get more information about the terrific produce sharing you can purchase and participate in right here in Central NY! I think what they are doing is amazing!
Thanks Amy and Chris...have a great week and I'll see you this weekend!
August 13, 2008
From naked to furry, King Kong gets his features
So we had the awesome, rocked out styrofoam base for King Kong that Beth sculpted while she was here. After she left I was able to work that base magically into a thing of beauty - wait, this is KK we're talking about...hmmm, well I think he's very handsome!
The first thing I did was to sand him down a little around the edges to soften the shape up a bit, exaggerating it just a bit because icing would be filling the areas back up. After that, I started with his face. I used sugar paste to give him his features; his "skin", eye sockets, eyebrows/forehead, his nose, cheeks and mouth. The mouth, oh that mouth! I made him a tongue and some dentures and short little fangs. I even made some ears! So all of that went on first, applying and smoothing with my tools until I thought it was just right. Then I painted those parts. I love the tongue and mouth the best I think!

After painting his face I moved onto his hands and feet. I used a royal recipe with extra drying/hardening power and a small artist spatula to apply the icing on his extremities and then smoothed them with a dampened brush. I gave him the impression of toes and fingers and set him to dry a bit so I could handle him before moving on. I used a heat gun in between stages to dry him enough that I could handle him. I should say I used it sparingly...sugar does boil you know, even in icing form!
From then it was a matter of adding the "fur". Again, more royal and drying time. The icing was applied in a dab and lift motion to pull out the fur. The heat gun came in real handy here, very quickly I came to a point when I couldn't handle him much at all until he dried. All the while I kept "testing" the position of his bride in his arm to leave enough room to squeeze her in there later.


So there you have it, King Kong gettin' his fur on. Sweet!
August 12, 2008
Last season's cake displays for sale now...
Let's call this one "She Fakes The Cake"!
Every year I've made display cakes either for shows, photo shoots, mock ups, or just when the mood strikes to show a design fresh for the season. I am selling a couple of last season's displays now to make room for new displays that will be designed and created this winter, and will continue to create and retail faux cakes during the off season later this year.
This is a great way to have a one of a kind display that one may not ordinarily have a budget for. You can serve kitchen cakes from me if you are a local bride if you like, but it is not mandatory. Wouldn't this be terrific for a bride out of state? I think so too. Have your favorite local bakery provide your mouth watering dessert, and I'll provide the eye candy. These are not for rent, all sales are final. Shipping can be arranged. Email me today to inquire! You can fill out the inquire form on my site and mention fake cake purchase in the description area, or just email me directly at jen@shetakesthecake.com 4 tier winter scene, will ship with snowflakes packaged separately for you to place to avoid breakage in transit. Dimensions are 10"x4, 8"x4, 6"x4, 4"x4 tiers. This cake was featured in the Syracuse Post Standard in a previous season. Hand sculpted, hand painted fondant details on a fondant base. $150.00 plus shipping and packaging.
 My "Red Acanthus" cake is a fondant covered display I carved, hand painted, piped and detailed in gold. It's rich tones and style leaning toward Italian or Greek will be fabulous at any ornate, formal wedding. The base tier is approximately 12" round diameter narrowing to a 6" tier at top, each carved subtly. This incredibly ornate cake display featured in the current issue of Well Wed NY is $400.00 plus shipping and packaging.
 This delightful and lovely little cake is done in the still very popular chocolate brown and raspberry pink combo. With hand made and hand painted sugar hydrangeas adorning the hand carved tiers atop a plaid tier which is also hand painted. This cake wowed the crowd at The Wedding Salon in NYC and was called a "sweet little cake" and "very nice" by Sylvia Weinstock at the show. It's a very petite cake at 9" diameter at the bottom tier. Hydrangeas will be packaged separately to avoid breakage in transit. This favorite in my portfolio is $200.00 plus shipping and packaging.
 This stunning white, yellow, and black cake is one of my recent favorites. Designed to compliment a custom invitation suite by Bride Design, it stands at about 13" high with a bottom diameter of 10". All piped freehand, as most of my cakes are, the center tier is a yellow base with striking white detail giving the impression of a floral like mums or spider mums. Tied off with a sheer black bow and detailed at the bottom with crisp black graphic icons. This display cake is $200.00 plus shipping and packaging as well.
I've a couple more that I'll post another time. For the past year I've been fighting the magazines' trend for couples to get a display cake that's fake and serve sheet cakes to their guests, but with the economy the way it is and all other wedding related costs on the rise, I think that the idea of a fake cake is going to be more than a quickly passing fad. In an effort to assist couples with their ever tightening budgets I've decided to branch out into the world of fake cakes as well. I've been creating them for years, why not make them available for you and your guests instead of just keeping them on a pedestal in my studio? Each of these cakes I'm making available to you would be priced at about $8-$12.00 PER serving if they were real cakes. We can all do the math. Now you really can have your dream cake and eat it (another cake) too.
August 11, 2008
King Kong in Styrofoam... courtesy of Beth!
So here we have the fabulous Beth from The Pink Cupcake Bakery in Mt Vernon, OH. As I mentioned in my last post, Beth drove from OH to lend a much needed hand in the completion of Kara and Greg's huge NYC Movie themed cake order. The piece de resistance was the King Kong topper for the main display; the Empire State Building of course! Beth gave me a great head start on the topper by sculpting the basic body out of Styrofoam with my Dremel too. She noted with a huge grin and lots of laughter that she may have missed her calling. I think she could be right, she did a FAB job on this piece and without the start she gave me I doubt King Kong would have been nearly as cute!
Check out some shots I took while braving the styro storm as she worked!

Can you see him yet? She says... yep, I get it...keep going! This is great!

He's really starting to take shape, this is getting exciting, right about now is when she exclaimed she should have been a sculptor.
And now for the clean-up...what a mess!!! Making a mess is always more fun when you didn't make it by yourself!


Below, is the sculpted shape of Kong in all his glory, perched atop the building just to check scale and position. Perfect!

The topper was added to the order very close to the due date, I have to admit I was at a loss for how it would get done. Were there other things that would have to be omitted or cut back on to accomplish it? "Yes"is often the answer. When one is lucky enough to have clients that put their faith and trust in the artist they've hired, what matters is that the job get done in the best way possible. It's my job to see that it gets done. In this case, help was needed to accomplish this task. Sure, part of me was a little disappointed that I felt I couldn't manage it on my own the but majority of me was extremely satisfied that I was smart enough to call on my very talented friend to hire help when it was obviously needed. Where was I while Beth was covering herself in stryo? Working on the building for Kong to sit on! The downside to being a sole body in a custom shop I guess is, well, that I'm the only one. It's not always fun and games, and it's not always a walk in the park. Ever wonder why I only take one or two a weekend?? It's because I don't have a staff of 12 under me, that's why. Oh my...could you just imagine if I did?!
Thanks again Beth for coming all the way from The Pink Cupcake Bakery in Mt Vernon, wish I could have you here more often!
Kong is looking good, now to add "fur" and details, and of course his bride! Check back soon for those shots...got some good ones of the progress while I finished him off. Who knew he could be such a cutie?!
August 10, 2008
Kara and Greg's Amazing NYC Movie cakes FINAL ACT
Ok, so we're skipping to the final scene...I know many of you have been anxiously awaiting the outcome of this order and believe me I toyed with the idea of making you wait it out a bit more so that I could edit and put up the photos in the order in which they were taken. Well...I'm anxious for you to see them too but for the last two weeks I have had to put other things on hold while doing this order so I'm playing catch up right now with various duties in and out of the studio - which means I can't sit and blog the way I'd like for a few days.
First of all...I think I'm caught up on sleep. Yesterday I was pretty much in a coma. Here's another behind the scenes tid bit for you, when it's a one person business and the deadline looms with perishable product, sometimes very little sleep, if any at all, is had. I don't know sometimes if I can take it. With God's help and the amazing support of family and friends I muddle through. This order was no exception. I'll post more later on the specific support given, but I have some amazing and talented friends in this business and a couple of them came to give more than just moral support. Beth from The Pink Cupcake Bakery in Mt. Vernon, OH came out (yes from OHIO!!) to lend a hand and brought her daughter along for help. They were here for just a day and a half but I can not tell you how much help that was! And wait till you see what Beth did...she's a rock star with Styrofoam and my Dremel tool!! There will be a whole post dedicated to her talent soon. And then of course there is my pen and paper gal, Erin, from Bride Design here in Syracuse; she came over the other evening to help me paint. She's an amazing painter, did you know that? I think the task at hand was a bit limiting and boring compared to her usual subjects, but again, the help she provided was really a much needed, incredible boost.
Ok, so now for the eye candy. I'm skipping ahead here to the finished product. See how nice I am? I know you've been waiting. You'll have to come back again in a few days to see the rest of the order progress, I have lots of pictures to show you don't worry.
The main "cake" is the Empire State Building with King Kong and bride. I refuse to call it a cake, as it contains NO actual cake. This is a display. It's displayed like a cake, it takes the place of a cake, it could have been done in cake. But it is not cake. The cakes are in the centerpiece displays, so no cake here was needed. The display is made of Styrofoam and pastillage. More on King Kong later, but his insides are also Styrofoam and then I detailed his face with sugar paste and finished him off with royal icing. The bride is sugar paste. More on the construction of the topper in another post.
The centerpiece cakes were also the table names. Each table was named after one of their favorite NYC movies. These were incredibly time consuming and some of the parts were just plain difficult, but the desired finished look was spot on and I'm very happy with them. While setting up, we met the father of the groom, who was also very pleased. Let me just tell you how nice it is to hear the phrase "Worth every penny". It's nice, very nice. So here are just a couple of the table cakes, the films are obvious.

Technically all edible, each of the centerpiece cakes consisted of the film canister cakes, the film reel, a scene from the movie depicted on the film strip in printed icing sheets, all laid out and cut out by me, the movie poster to match. The movie posters are front and back edged with gold and silver dragees - painstakingly placed by Beth and Arie while they were here...this took forever! I can only imagine if they weren't here to help that this part would not have been done. Each cake was placed on a custom mirrored charger plate made by a friend of the parents - I'll get that info later, they were really cool. We loved how in most of the photos the film strip look of the charger reflected back up onto the cakes or the cakes onto the mirrors. Usually a reflection like that ruins a cake shot - the blade of the cake knife for instance often leaves an odd blemish looking shadow on the cake, not so this time. Oh, and did I mention that the cake flavors were all different? I doubled up on a few flavors, but this was definitely an order where the 20 Qt Hobart mixer did not come in handy - which of course added to the time it took to bake. Note to DIYer's...don't try 16 different cakes at home, from start to finish this part took two days and no sleep.
Ok. Thanks for your patience, thanks friends for your help. That's it for now. Enjoy. Me...I'm going to go ice my hands some more, and catch up on the rest of my emails and phone calls from the last 2 weeks. I'll edit and post some more "in progress" shots over the next couple days but then it's right back into the thick of it with other orders so give me a minute or two...it's just me here!! The progress shots are really worth a look though, so come on back to see them!
August 2, 2008
Kara and Greg's NYC Films Wedding ACT ONE
So this is the first of what will hopefully be several blog entries chronicling the progress of Kara and Greg's wedding cake. Their exciting theme...films shot or set in NYC. Each of Kara and Greg's centerpieces will depict a different film - is that the coolest idea or what? They're not having boring old table numbers, they're using their favorite movies!! I will post as I'm able to...but obviously I'm a bit busy with the actual cake ;-) The part I'm showing a glimpse of now is the seemingly endless construction of the edible (technically) but non cake parts of all of their 16(yes, SIXTEEN) centerpiece cakes each with film canister cakes (not shown since I bake fresh and we're not there yet) and then on top of each a pastillage film reel with filmstrip matching the movie poster on a pastillage plaque that will be positioned on each reel. There will be a little bling and a bit more strip than shown in these photos, but that's all in due time. A little tid bit of info client's don't know about is that for every cake order there is at least one piece of decor that can and will be done ahead of time, but there are so many that just can't be done until the cake is baked. Whether it's hand painting on a fondant covered cake, or in this case, positioning very fragile strips of fondant "film" with printed icing sheets to duplicate a favorite scene from the movie, many things just can't be done ahead. Because we want an unwinding effect, the last strips of film for each cake will have to be placed when the cakes are done while the fondant film is fresh and pliable; this means I can't make that part until the cakes are ready for it. It's this type of work that usually leads to very late nights and sometimes very long set up on site when cakes are delivered.
Want to see just how much was involved in making the parts for that centerpiece above? I've been taking just a few photos of some steps that were necessary to get there. And yes, that means I actually left out some steps!! Pounds upon pounds of pastillage had to be made, drying forms had to be constructed, dough rolled and cut, dried on forms, parts painted, "glued" with icing in sections, more parts added...each step with significant drying time allowed... click to see a larger view of the shots.
I'll try to add some shots of the "film" being made when I make those additional strips toward completion of the cake.The centerpiece cakes are not the entire order, but you'll have to check back for the rest of this exciting wedding cake story! Until next time...